 |
|||||
|
|
 |
|||||
|
|

Mounting & InstallationThe All Sky Camera may be easily mounted with any number of methods. The preferred mounting is a standard satellite TV 1-5/8" J-pipe mount, available from your local satellite TV installer, Radio Shack, or other supplier. Some models include poles up to 38" long, allowing it to reach far above a roofline or fencepost.Any of the poles, masts, wall mounts, roof mounts, eave mounts, and tripods intended for satellite TV or off-air TV antenna applications are good choices for mounting the All Sky Cam. Popular manufacturers are listed below. An alternative way to mount is to employ a sturdy L bracket purchased from a hardware store, screwed into a horizontal surface with wood screws. For temporary mounting, it is also possible to screw a long wood screw through one of the 1/4-20 holes in the side of the ASC and into a vertical surface. Mounting ResourcesCable Connections
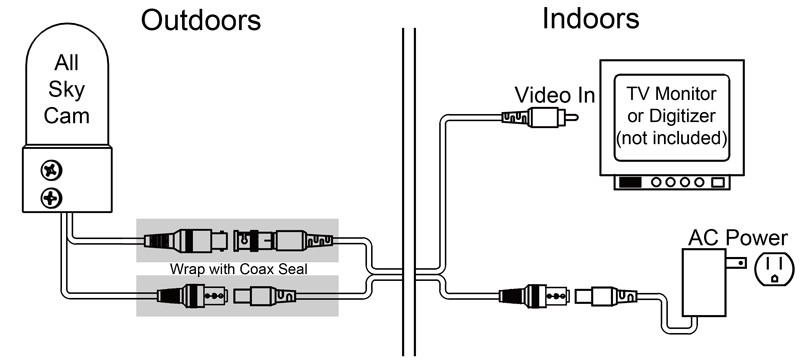
 After establishing a mounting for the camera, pass the camera's wires through the pole (if applicable) and connect it to the supplied extension cable. Then cable connections must then be wrapped with the included Coax-Seal weather stripping to prevent rain or dew from shorting out the power and video signals. See the Coax-Seal envelope for instructions. The extension cable can then be routed through the pole and into the building inside. It is recommended to orient the camera on the pole so that the side with an engraved 'N' points north. This allows easy understanding when viewing the screen. The 'N' side is also the side with the two set screws. To connect the All Sky Cam to a television set, look on the back of the television for a yellow video input connector. It may also be labelled as "Composite", "Video In", or "Video". Then set the TV's input selector to that input (see the TV's user manual for instructions). |
|
| Introduction - Astronomy - Weather - Software - Installation - Specifications - How To Buy - Support - Terms |
![]()
All text and images are © 2008-2020 Moonglow Technologies - All Rights Reserved.